How to implement SPNEGO for Rhythmyx
What is SPNEGO?
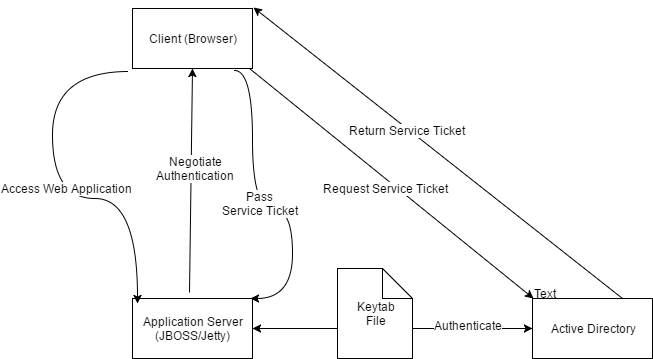
SPNEGO is a security mechanism that has subsystems that allow HTTP negotiate authentication to occur allowing single sign on authentication through Active Directory. HTTP negotiate authentication is supported by Internet Explorer, Firefox, and Chrome.

NOTE: In 7.3 . 2 Patch |
Through the SPNEGO Single Sign-On feature, a user who logs in to Windows through a domain is automatically authenticated into the Rhythmyx Content Explorer without having to enter a user name and password. In order to enabled SPNEGO Single Sign-On with the Rhythmyx Content Explorer, the setup requires configuration on the Windows domain, the Rhythmyx Server, and the user's browser.
The steps should be followed closely, and it should involve someone who is responsible for the domain and understands the creation of domain service accounts.
NOTE:Once the feature is turned on, a user cannot logout and login to the same system as a different user. Instead the user must log out of Windows and login as a different user. |
Both the Rhythmyx Server and the client must be in the same Windows domain since Windows Single Sign-On is only supported for one Windows domain.
IMPORTANT: You must add domain users (or user’s group) to their roles in the Rhythmyx Administrator tool. Windows Single Sign-On does not include a role provider. If you do not add users (or user’s group) to their roles in the Rhythmyx Administrator tool, the users cannot login through Single Sign-On. They must login through other security providers that are configured in the Rhythmyx server, such as the backend security provider. Single Sign-On is only supported through a web browser, Single Sign-On will not work for the Percussion Developer tools or WebDAV.
Assumptions
You must have Rhythmyx version 7.3.2, patch level 20161228 or newer to take advantage of Windows Single Sign-On using SPNEGO. You must already have a matching User from the Windows domain to the Rhythmyx Server or Groups assigned to their appropriate Percussion Rhythmyx role(s). You can find all of the necessary steps in Chapter 6, Maintaining Users, of the Rhythmyx Administration Manual for creating, importing, and maintaining users in Rhythmyx.
Information you will require to set up SPNEGO for Rhythmyx:
Example value in documentation | description |
|---|---|
| rhythmyx.myintranet.local | Fully qualified domain name of the url users will be accessing the Rhythmyx server from. |
| MYCOMPANY.LOCAL | Windows Realm to authenticate users against (IN uppercase) |
| rhythmyx-spnego@MYCOMPANY.LOCAL | A service account name within the domain to use to authenticate with e.g. rhythmyx-spnego@MYCOMPANY.LOCAL |
| HTTP/rhythmyx.myintranet.local@MYCOMPANY.LOCAL | The Principal. This Is HTTP/{Rhythmyx fully qualified domain}@{windows realm} |
mycompany-domain.mycompany.local | the fully qualified domain of the domain controller |
Steps to Implement Windows Single Sign-On Using SPNEGO
You will need to create 3 configuration files for SPNEGO.
- Keytab File - e.g. http-web.keytab
- krb5.conf - Kerberos configuration
- spnego-login.conf - java JAAS configuration file
Step 1: Create the Keytab
A keytab file contains encrypted keys that can allows the Rhythmyx server to automatically authenticate against the domain controller using the service account.
- Create a new service account user for creating the keytab. Make sure this is a new user (for example, rhythmyx-spnego) and not an existing user account.
- Next log into a Windows machine on your domain as the Domain Administrator.
- Generate the keytab
Example Keytab generations commands:
Where "rhythmyx-spnego" is the new user you just created:
ktpass /out http-web.keytab /mapuser rhythmyx-spnego @MYCOMPANY .LOCAL /princ HTTP/rhythmyx.myintranet.local @MYCOMPANY .LOCAL /kvno 0 /pass * /ptype KRB5_NT_PRINCIPAL |
If the Rhythmyx Server and the domain controller are using Windows Server 2012 and above you should use AES128 instead of the less secure rc4-hmac :
ktpass /out http-web.keytab /mapuser rhythmyx-spnego @MYCOMPANY .LOCAL /princ HTTP/rhythmyx.myintranet.local @MYCOMPANY .LOCAL /kvno 0 /crypto AES128-SHA1 /pass * /ptype KRB5_NT_PRINCIPAL |
The principal (Example: HTTP/rhythmyx.myintranet.local@MYCOMPANY.LOCAL) is created by combining HTTP/ with the Rhythmyx service fully qualified domain then @ with the windows realm. (So: HTTP/{my_rhythmyx_service_fully_qualified_domain}/{@WINDOWS_DOMAIN}).
During generation the command will prompt you for the newly created domain user’s password.
Enter the password twice. Upon successfully entering the password twice, the keytab file, http-web.keytab, should be in your
current working directory.
Example keytab creation prompt:
Targeting domain controller: mycompany -domain .mycompany.localUsing legacy password setting methodSuccessfully mapped HTTP/mycompany -domain .mycompany.local to rhythmyx -spnego .Type the password for HTTP/mycompany -domain .mycompany.local:Type the password again to confirm:WARNING: pType and account type do not match. This might cause problems.Key created.Output keytab to http -web .keytab:Keytab version: 0x502keysize 82 HTTP/rhythmyx.myintranet.local@PERCUSSION.LOCAL ptype 0(KRB5_NT_UNKNOWN) vno 3 etype 0x17 (RC4 -HMAC ) keylength 16(0x7e631beb505ed4dbdb49bbf41b5ec8e4) |
NOTE: Once you create the keytab file, you will not be able to login to a Windows client machine on the domain with the newly
created username (for example, rhythmyx-spnego). This is not an issue because the keytab enables running Rhythmyx with any other
domain user. If you reset the password for the username, you must recreate the keytab (which, in effect, resets the password).
3. Confirm that the command entered above to ktpass also made your new user a Service Principal Name (SPN):
As the Domain administrator, enter the following command in a command prompt:
setspn -L {my SPN user) |
You should see output like the following example:
Registered ServicePrincipalNames for CN=RHYTHMYX -SPNEGO ,CN=Users,DC=mycompany,DC=local: HTTP/rhythmyx.myintranet.local |
Step 2: Enable the SPNEGO (Kerberos) Configuration File on the Rhythmyx Server
Create the following file: {Rhythmyx_server_root}\rxconfig\Server\krb5.conf (There is also an example configuration file at {Rhythmyx_server_root}\rxconfig\Server\krb5.conf.sample)
Edit in the details for your domain into krb5.ini
Example krb5.ini:
[libdefaults]default_realm = MYCOMPANY.LOCALdefault_tkt_enctypes = aes256-cts-hmac-sha1-96 aes256-cts aes128-cts rc4-hmac des3-cbc-sha1 des-cbc-md5 des-cbc-crcdefault_tgs_enctypes = aes256-cts-hmac-sha1-96 aes256-cts aes128-cts rc4-hmac des3-cbc-sha1 des-cbc-md5 des-cbc-crcpermitted_enctypes = aes256-cts-hmac-sha1-96 aes256-cts aes128-cts rc4-hmac des3-cbc-sha1 des-cbc-md5 des-cbc-crcticket_lifetime = 600kdc_timesync = 1ccache_type = 4[realms]MYCOMPANY.LOCAL = {kdc = mycompany-domain.mycompany.localadmin_server = mycompany-domain.mycompany.localdefault_domain = MYCOMPANY.LOCAL}[domain_realm].MYCOMPANY.LOCAL = MYCOMPANY.LOCAL[appdefaults]autologin = trueforward = trueforwardable = trueencrypt = true |
JBoss:
Modify login-config/xml and uncomment the following section:
<application-policy name= "spnego-server" ><authentication><login-module code= "com.sun.security.auth.module.Krb5LoginModule " flag= "required" ><module-option name= "storeKey" > true </module-option><module-option name= "isInitiator" > false </module-option><module-option name= "useKeyTab" > true </module-option><module-option name= "keyTab" >file: //C:\location\to\my\keytab/module-option><module-option name= "principal" >HTTP/rhythmyx.myintranet.local @MYCOMPANY .LOCAL</module-option></login-module></authentication></application-policy><application-policy name= "spnego-client" ><authentication><login-module code= "com.sun.security.auth.module.Krb5LoginModule " flag= "required" ></login-module></authentication></application-policy> |
Jetty:
Step 3: Create the spnego-login.conf File
Create the file at {Rhthymyx_server}\rxconfig\Server\spnego-login.conf , the keytab file location must have the slashes escaped ( example: \/location\/to\/my\/file)
Example spnego-login.conf:
rx.policy { com.percussion.services.security.loginmods.PSRxLoginModule required ;};spnego-client {com.sun.security.auth.module.Krb5LoginModule required;};spnego-server {com.sun.security.auth.module.Krb5LoginModule requiredstoreKey= trueisInitiator= falseuseKeyTab= truekeyTab= "C:\/path\/to\/keytabfile\/http-web.keytab"principal= "HTTP/rhythmyx.myintranet.local@MYCOMPANY.LOCAL" ;}; |
Step 4: Add a SPNEGO Security Provider to the Rhythmyx Server
To add a SPNEGO security provider:
- Login into the Rhythmyx Server Administrator tool as either a backend table user or some other already established Admin user.
- Click the Security tab at the top of the dialog, then click the Security Providers tab at the bottom.
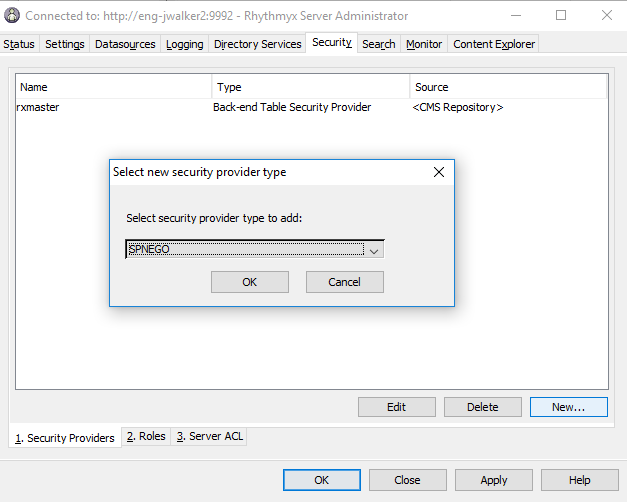
- Click New. The Rhythmyx Administrator tool should display the “Select new security provider type” dialog.
- In the Select security provider type to add drop list, choose SPNEGO. Click OK.
- A secondary dialog window opens. Click OK.
- Click Apply to save the security provider.
Step 5: Add SPNEGO users
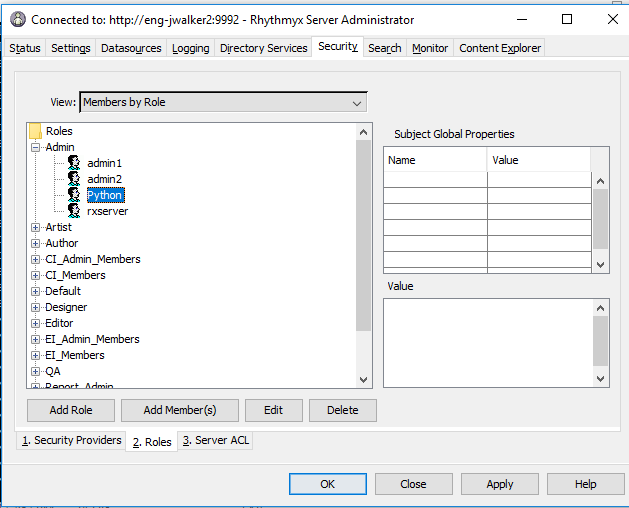
- Choose the Roles tab under the security, add the new members to the desired roles. For Example:
- Go to the database connection where you have Rhythmyx located upon, and go to the USERLOGIN table, and insert your newly created users.
- Fully reboot the computer where the Rhythmyx server is located. Also reboot any machines that will be connecting to the Rhythmyx server. Perform
these reboots so that the client machines accept the new security ticket. - Restart the Rhythmyx Server with any username except the SPN username (the keytab performs pre-authentication).
Step 6: Configure Clients for Windows Single Sign-On
Configuring Internet Explorer and Chrome to Support Windows Single Sign-On
Since the default configuration for Internet Explorer supports Windows Single Sign-On, you can ignore this section if you have not altered
the default configuration. Otherwise, perform the following steps to configure Internet Explorer to support Single Sign-On:
- Under the Tools menu, open Internet Options.
- On the Advanced tab, under Security, check Enable Integrated Windows Authentication.
- On the Security tab, check Enable Protected Mode.
- Under User Authentication on the Security tab, choose automatic logon only in Intranet zone.
Perform the following substeps if you need to access the server using a fully qualified name of the machine, where the name is
appended with the domain name (for example, http://rhythmyx.myintranet.local). Otherwise, proceed to Step 5.
- On the Security tab, check the Local intranet icon.
- Click the Sites button to display the Local intranet dialog box.
- Click the Advanced button.
- At Add this website to the zone, enter the host name (for example, http://rhythmyx.myintranet.local).
- Click Add to add the URL to the Websites: list.
- Click Close.
- Click OK on all open dialog boxes to save your changes.
- Restart Internet Explorer.
Configuring Firefox to Support Windows Single Sign-On
To configure Firefox to support Single Sign-On, add the Windows domain to the network.negotiate-auth.trusted.uris property:
- In the Firefox address field, enter about:config. Read the pop-up message and click I’ll be careful…. Firefox displays the
- about:config page with a list of configurable preferences.
- Right-click on the network.negotiate-auth.trusted.uris property and from the popup menu, choose Modify. Firefox displays the
- Enter String Value dialog.
- Enter the name of the Windows domain and hostname. For example, .mycompany.local,ts-win2008
- Click OK to save the new configuration.
Step 6: Test the Windows Single Sign-On Implementation
To test the implementation, login to a Windows client on the domain of the Rhythmyx server as a user in a Rhythmy Role. Start a browser
configured to support Single Sign-On and connect to the Rhythmyx Server. You should be logged in automatically; the browser will take you to
Content Explorer.
Troubleshooting
You cannot have multiple users mapped to the same machine. If you do, authentication will fail, so you must delete the old mappings.
In the following steps, replace machine-name.domain.name with your fully-qualified machine name. Replace username with the user you
would like to use for SPN. It’s important to note that for keytab, the user will no longer be able to log in with their password once a
keytab is generated, so do not use a normal username.
Perform the following steps to delete all old SPN Registrations before configuring keytab:
1. As Domain Administrator, enter the following at a command prompt to see if the user is mapped. Perform this step for any user
that you suspect is mapped:
setspn -L <username> |
Example Output:
HTTP/<machine-name.domain.name>HTTP/<machine-name> |
2. As Domain Administrator, delete the old mappings by entering the following at a command prompt:
Make sure no other users are mapped to the machine.
setspn -D HTTP/<machine-name.domain.name> <username>setspn -D HTTP/<machine-name> <username> |
3. If you are on Jetty, add the following java arguments to jvm.ini at jetty\defaults\start.d\jvm.ini
-Dorg.eclipse.jetty.LEVEL=debug-Dsun.security.spnego.debug=all-Dsun.security.krb5.debug= true-Djava.security.debug=gssloginconfig,configfile,configparser,logincontext |


