Enabling Web Server Compression
Web-Server Compression
Web-server compression is a useful tool that can improve transfer speed and bandwidth between web server and client machines. Compression can reduce the load time of a web page; when compression is enabled on the client side as well as the server side, page speed can be improved dramatically. This document will outline how to enable web-server compression within Windows IIS, Apache, and Nginx web servers. Google Page Speed will rank pages at a higher level if their hosting web server utilizes compression.
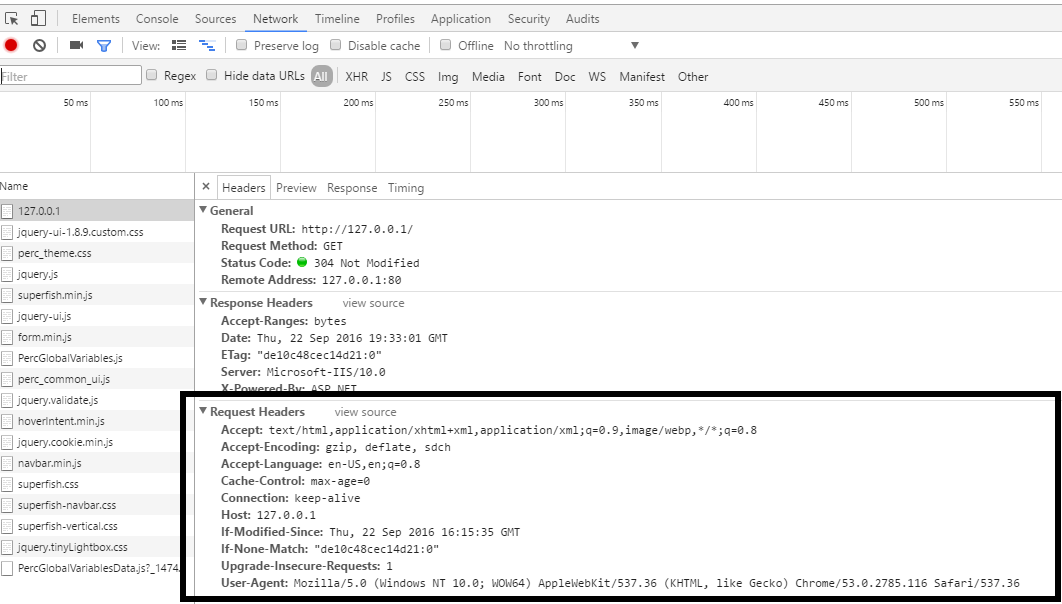
The following image (outlined using Google Chrome) exemplifies some of the information sent and returned between the client-side web browser and the web server. This can be viewed by enabling Developer Tools and navigating to the Network tab.
In the above example, the Accept-Encoding flag states that the browser is capable of accepting gzip, deflate, and sdch compression methods.
Configuring Compression in Windows IIS
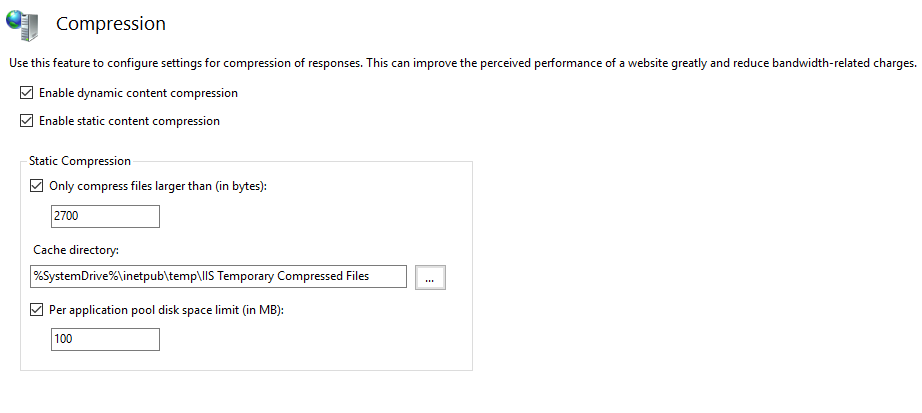
To configure compression first ensure that the static/dynamic content compression features are enabled.
- Open the 'Add Roles and Features Wizard.'
- Select Web Server (IIS)
- Select Web Server
- Select Performance
- Make sure that 'Static Content Compression' and 'Dynamic Content Compression' are enabled
From here, you will be able to enable the compression feature. To do this:
- Launch Windows IIS
- Navigate to the main node of IIS (if you wish to enable compression for all sites) or the specific site you'd like to enable compression for.
- Double click the compression icon
At this point, you will have several options. If your web server is already pretty CPU heavy, do not enable dynamic content compression as this feature utilizes more CPU cycles. Static compression will only utilize CPU cycles during the initial compression, and once it is cached it won't rely on the same process. Static compression can be safely enabled for this reason. You may choose to compress files larger than a specific size; it makes sense not to compress smaller files. The cache directory maintains the compressed files, so if you are low on disk space you may need to select a different directory. The last option allows you to specify how much space is used per web application for compression. Once you are finished, you may click 'Apply' on the right side of the screen to apply the compression algorithms.
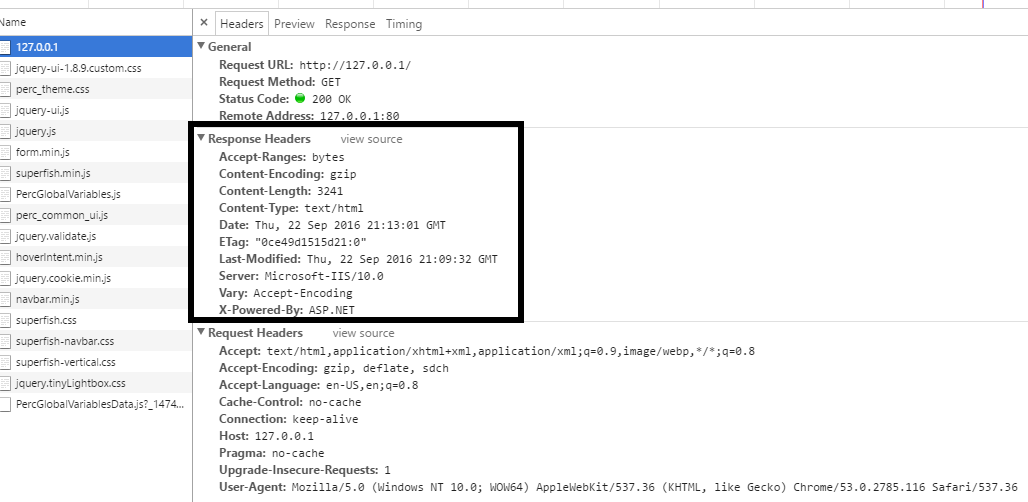
If compression has been successfully enabled, you will see in Developer Tools that the Response Headers will include a 'Content-Encoding' field. The following image demonstrates this:
The above image demonstrates that the web browser is accepting content that has been compressed using gzip. If you do not see this after enabling compression, try clearing the browser's cache as content-encoding may not be used if caching is in place. Also make sure that the file size you are requesting exceeds the compression threshold.
Configuring Web-Server Compression in Apache
With the Ubuntu 16.04 OS, compression is enabled by default in the 'deflate' module when Apache is installed. You can view specific properties for the deflate module within the 'deflate.conf' filed located in /etc/apache2/mods-available (default). Within this file, you should see:
- AddOutputFilterByType DEFLATE text/html text/plain text/xml
- AddOutputFilterByType DEFLATE text/css
- AddOutputFilterByType DEFLATE application/x-javascript application/javascript application/ecmascript
- AddOutputFilterByType DEFLATE appliation/rss+xml
- AddOutputFilterByType DEFLATE application/xml
These flags enable compression of their respective entities. These may be commented out using the '#' directive. Within the deflate.conf directory, you may also control the compression properties. For example, these parameters may be added:
- DeflateCompressionLevel
- DeflateMemLevel
- DeflateWindowSize
To modify these values, you may simply enter a value after the flag such as: DeflateCompressionLevel 1. This value will set the compression level to be lower; this will make the files larger, but it will free up CPU cycles as less compression is used. One command for Linux users which may be handy:
wget --headers="Accept-Encoding: gzip" --save-headers http://www.your_site.com/index.html
This flag will preserve the Response Headers sent from the server; when viewing the downloaded file you will see the Response Headers at the top of the file. You should see something like:
HTTP/1.1 200 OK
Server: nginx/1.10.0 (Ubuntu)
Date: Fri, 23 Sep 2016 19:47:10 GMT
Content-Type: text/html
Last-Modified: Thu, 19 May 2016 16:35:16 GMT
Transfer-Encoding: chunked
Connection: keep-alive
Vary: Accept-Encoding
ETag: W/"573deb44-2c39"
Content-Encoding: gzip
If the deflate module is not configured by default, you may run:
a2enmod deflate
to enable this feature (Ubuntu).
For information on configuring compression in Apache on CentOS, further documentation can be found here:
https://www.digitalocean.com/community/tutorials/how-to-install-and-configure-mod_deflate-on-centos-7
http://httpd.apache.org/docs/2.0/mod/mod_deflate.html
Configuring Web-Server Compression in Nginx
By default, compression is enabled within Nginx as well. This is configured within the nginx.conf file, located in the Nginx root directory. Below illustrates the options:
- To turn compression on and off, simply use the gzip on | off flag.
- gzip_min_length specifies not to compress files smaller than 256 bytes
- gzip_vary on | off specifies whether or not to compress files passed through a proxy server
- gzip_comp_level specifies the level of compression to use
- gzip_buffers sets the number of buffers and the size of the buffers
- gzip_http_version specifies the version of gzip compression to use
- gzip_types specifies which type of files should be compressed. text/html is included by default
Further documentation may be found here:
http://nginx.org/en/docs/http/ngx_http_gzip_module.html#gzip_buffers
To verify whether or not compression is working, you may run the following commands on the server:
curl -H "Accept-Encoding: gzip" -I http://www.your_site.com/index.html
for example. You may also test a variety of other files:
curl -H "Accept-Encoding: gzip" -I http://www.your_site.com/web_resources/themes/your_site/css/yourCss.css
curl -H "Accept-Encoding: gzip" -I http://www.your_site.com/web_resources/themes/your_site/js/javascriptFile.js
You should also notice the size of the downloaded file is much smaller.


